


1
CONNECTED PLAYERS
+25,000
REGISTERED PLAYERS
+50
PLAYER RECORD

If you just joined our community and you need some guidance on how to start playing our server, you came to the right place.
First of all, if you joined for the first time, after logging in into the server, you will have to do /register <password> <password> then /login<password>. After the first join, you will only need to keep using /login <password>
Also on the first login, We want to make sure everyone has knowledge of the rules. So you will have to read all rules, which can be found by our Rule's holder NPC in spawn. Right-clicking on the NPC, it will give you our general rules. You will auto-join the server as a member but do make the time to read the rules or ask staff about any unclear information about the rules to avoid any unwanted punishments.
After you successfully done all of it, You will see that spawn is protected from building to prevent griefing. To be able to build your house, you will need to warp into the wilderness. You can also do /rtp which will randomly teleport you in the world. Do try to build away from others! Be a good neighbour!
To help you in your gameplay, we have also implemented some useful commands. Below is a list of some of the basic ones, and you can always go to the tutorial room by typing /tutorial to check out the rest of them. You can also check the list of our other guides by doing /guides.
- /sethome <name> --> Sets home at your current location.
- /home <name> --> Teleports you to that home.
- /edithome <name> --> Edit a home.
- /edithome <name> privacy <public/private> --> Edits the home's privacy setting.
- /phomelist --> See a list of public homes.
- /spawn --> Teleports you to the world spawn, at the starter island.
- /list --> Shows you list of online players.
- /shop --> Teleports you to the server shop where you can buy and sell materials and/or items.
- /balance, /bal or /money --> Shows your money in-game. Can also show you another players money if you use /balance <player>
- /joindate <username> --> It shows the registration date of that player on the server.
- /sentinel --> Shows a quick list of useful commands in-game.
- /helpop <message> --> Send a message for only staff members.
- /co i --> Toggle the inspector to know who placed a block. Left click to get the data on the current block, and right click for the block on-top of it.
- /starter --> Gives you a general guide on how to start your adventure on the server.
- /claimsguide --> Gives you a general guide about the Claim plugin.
- /townguide --> Gives you a general guide about the Town plugin.
- /protectionguide --> Gives you a general guide about the Belongings' protection plugin.
- /donatorguide --> Gives you a general guide on how to donate to the server.
- /auction --> Brings up the auction interface.
- /auctionguide --> Gives you a guide about the auction plugin.
- /shopguide --> Gives you a guide about how to make and use Chest shop in SentinelCraft.
If you're playing with a friend or want to play with someone in-game, these are some commands that might interest you:
- /tpa <player> --> Sends teleport request to teleport you to that player.
- /tpahere <player> --> Sends teleport request to teleport them to you.
- /tpaccept or /tpdeny --> Accept or deny the requests listed above.
- /msg <player> <message> Talk privately with your friend.
- /r --> Reply to the last person who messaged you.
- /ignore <player> --> Ignores that player's private messages.
- /voteshop --> Opens up the vote shop. Discontinued until a later date.
If you want to make money in-game, there are many ways of doing so.
- The first and most common way is by going to the shop /shop and selling stuff by right-clicking signs that say [Sell]
- You can also /vote and get 100$ and 10 tokens each time you vote on a link. There are five links you can vote on every 24 hours. So you can earn 500$ and 50 tokens a day.
- Some towns/players have shops where you can sell items in order to make money. You can also make your own shop.
- /Auction is also a great way to earn money.
- If you cannot wait to have money you can also /donate and receive up to 250000$ in-game cash, along with quite a few other perks.
This is a primarily survival server, that means this is a server that plays along the same line as single-player mode survival in vanilla Minecraft. No one in the game is granted creative except for the owner.
Your first task in starting out here is to find a place to build. You should check /map and find a nice location to settle. Once you have that you can set up shop and start building. You can harvest and sell wood logs, ores, and farmed goods to the shop to make some money.
This is only a starter guide into our server, as you can imagine there are a lot more commands that can be used. If you need any help with the more advanced commands we recommend asking other players or staff members for help. If you still have any doubts, more questions or even have any suggestions to help our server get better, you can go to our forums and post a topic about it.
We hope you enjoy your stay,
-- SentinelCraft Staff.
/g - Global chat. Everyone on the server will hear you. You are automatically put in this channel when first logging on to the server.
/l - Local chat. Only people within a small range can hear you.
/sm - Senior Member chat. An exclusive chat channel to talk to fellow Senior Members.
/tc - Town chat to talk to your town members
/pc - Party chat. Chat with only people in a pre-made party.
/msg <player name> - Sends a private message to a player.
/r - responds to a private message.
/w <player name> - Does the same as /msg
/tell <player name> - Does the same as /msg
/helpop - Admin Help. Sends a message to all admins/moderators online to help with a problem or a bug you’ve noticed.
/gon - Locks you to Global chat. Default on logging in. Important if you accidentally locked yourself to another chat.
/lon - Locks you to local chat.
/won - Locks you to World chat.
/smon - Locks you to Senior Member chat.
Coreprotect is a really handy plugin which helps us prevent and solve problems with griefing!
/co inspect OR /co i- Using this command will let you be able to see the blockdata of a specific block, right click a block and this will let you know who and when someone edited this block. (use this command again to disable it)
The amount of homes a player gets is dependent on their rank.
/sethome <name> - Lets you set a home, which you can tp to whenever you want! This name will be case sensitive - meaning you will need to type it in the exact same way to teleport to it later.
/edithome <name> privacy <public or private> - lets you edit your home to make it public or private. Making it public meaning anyone can teleport to that home whenever they want. (private vice versa)
/edithome <name> rename <new name> - Rename a home, give it another name if you don’t like it!
/edithome <name> description <text> - lets you give your home a description, describing what’s in it, and have ways to remember them.
/phomes - View available public homes. You can click one to teleport to it or you can
/phome <name> - teleport to a specific public home, name is case sensitive.
/tpa <username> - sends a request to teleport to another player.
/tpahere <username> - sends a request to let another player teleport to you.
/tpaccept - accepts a teleport request.
/tpdecline - rejects a teleport request.
/tpignore - lets you ignore someones teleport requests, not showing them in your chat anymore. Now those annoying tp request spammers won’t bother you anymore!
/rtp - lets you tp somewhere random on the map.
/back - lets you teleport to the last place you teleported from.
Here we have another section which we will use for lwc; our beloved protection for our chests that contain our valuables! You can also use this to lock doors and related items.
/cprivate - create a private protection, letting only you open the chest which is locked. Chests by default will be private.
/cmodify <player> - lets you give someone access to a chest, letting them be able to grab and put things from the chest.
/cpublic - create a public lock, letting anyone access the chest to take things in or out. This is useful for public farms, the benefit of a public chest over an unlocked chest is another player could come and lock an unlocked chest.
/cdonation - lets you create a donation chest, people can put a donation in the chest and only the owner of the chest is able to get them out of the chest.
/cpassword <password> - create a chest which can be accessed with a password.
/cunlock <password> - lets you remove the password on a password-protected chest.
/cremove - remove all protections on a protected chest.
/cpersist - lets you persist a command, use this again to disable it.
/lwc flag <command> - lets you modify the chest, letting it be able to be exploded, letting it close automatically and letting it be able to transfer items into hoppers.
/chopper on - When using this command and right clicking the hopper you’d like, you let the chosen hopper be able to transfer items to another hopper or a chest. You can use /cpersist with this when using a lot of hoppers and chests.
The donator commands, oh we love them don’t we? These are commands available to donators depending on the rank purchased. You can check out all donator packages and perks here.
/hat - Puts the item you’re holding on your head.
/workbench - Opens your own little portable crafting table!
/dispose - opens your trashcan for when your inventory is overflowing once again..
/cartography - opens the cartography table menu, letting you use it whenever you’d like!
/loom - Opens the loom menu, letting you use it whenever you want!
/ender - opens your portable ender chest.
/grindstone - opens your own personal grindstone, How nice!
/stonecutter - opens your own stonecutter. How do you fit that in your pockets??
/smithingtable - Opens the smithing table menu, letting you edit and upgrade your armor anywhere and anytime!
/anvil - Opens the anvil menu.
/backpack - opens a personal chest (3x9 or 6x9 depending on rank) which only you can access.
/feed - Fills up your hunger bar, with cooldown.
/condense - condenses gems like diamonds and emeralds into blocks.
/scavenge - Allows to break items into raw ingredients and extract enchantments with particular chance.
/heal - Heals you up instantly! Has cooldown.
/ptime - sets personal time for yourself - you can keep basking in the sunlight while others dig in the dark!
/pweather - set personal weather for yourself - no rainy days here!
/repairhand - Instantly repairs the item you’re holding; with cooldown
/findbiome - Finds the certain biome you’re searching for that is the nearest to you!
/uc menu - opens the menu that has certain other perks like, disguises, pets, gadgets, particle effects, mounts and some other things, but you’d have to find that out yourself (;
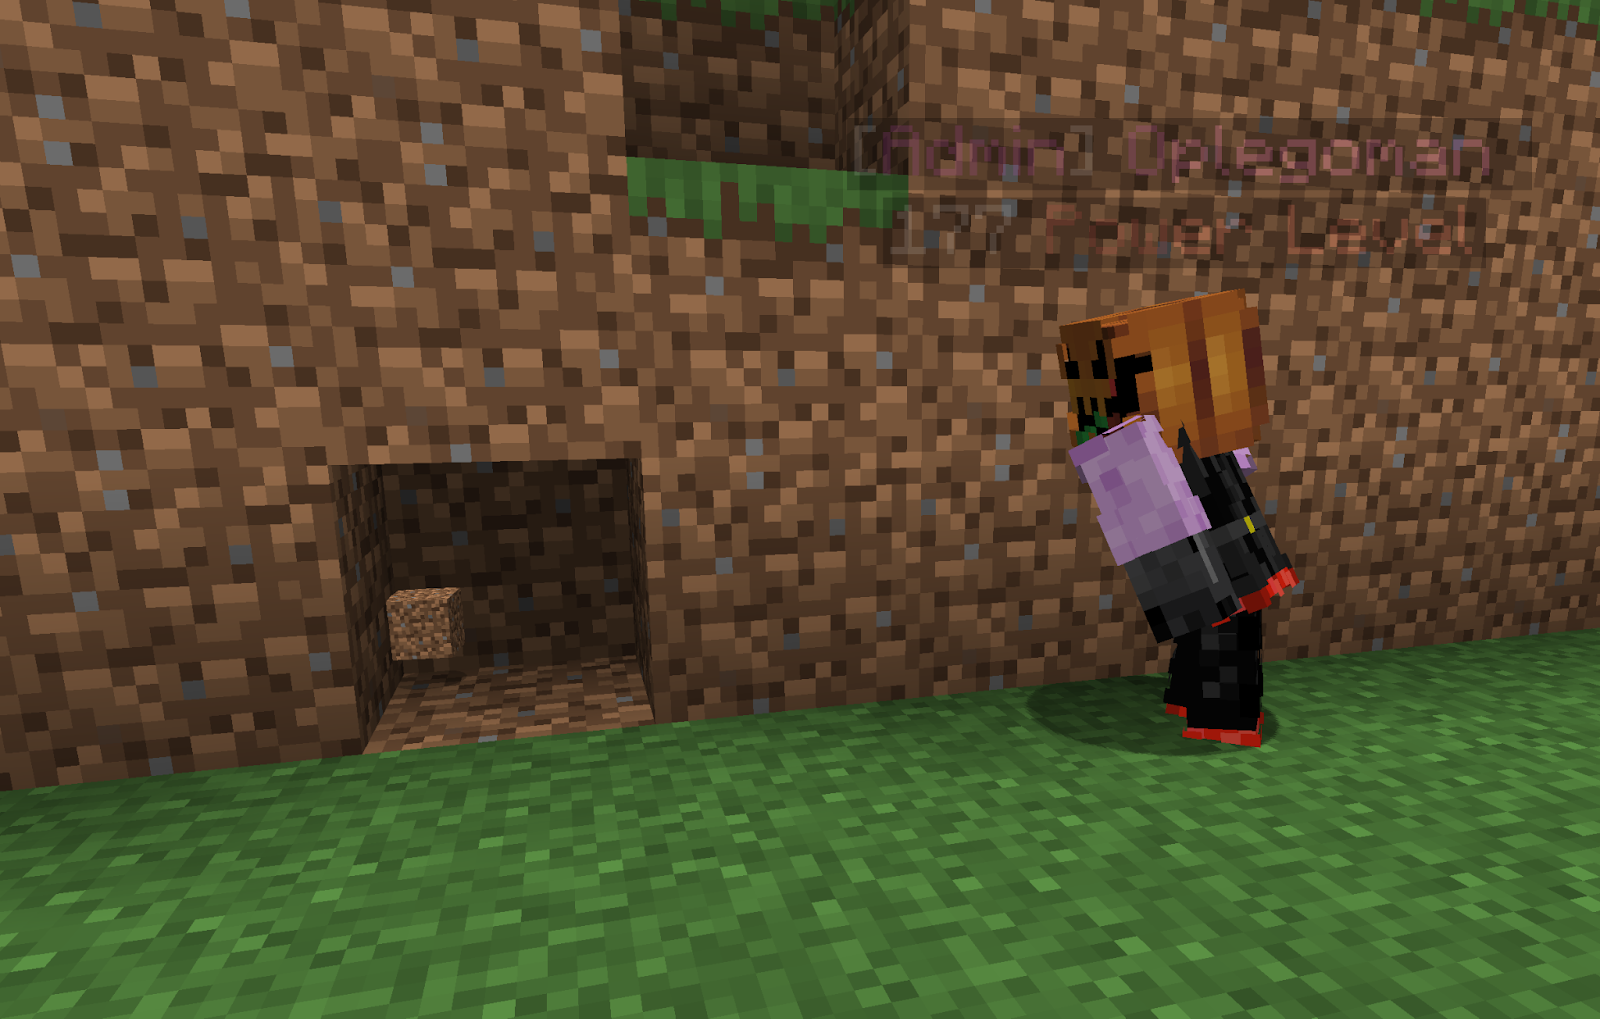 |
So you want to make some money on Sentinelcraft, eh? Well how about you GET A JOB!! Seriously, this guide is here to help you work out how to get started with Jobs so you can start making hard cash as you accumulate your wealth over time! Listed below is our quickstart guide to using the jobs system as well as information for all of the commands that will be useful for you to know so you can become the next overworked Oli!
To start off, let’s take a look at how to join a job. Type /jobs browse to see which jobs are available to take on.
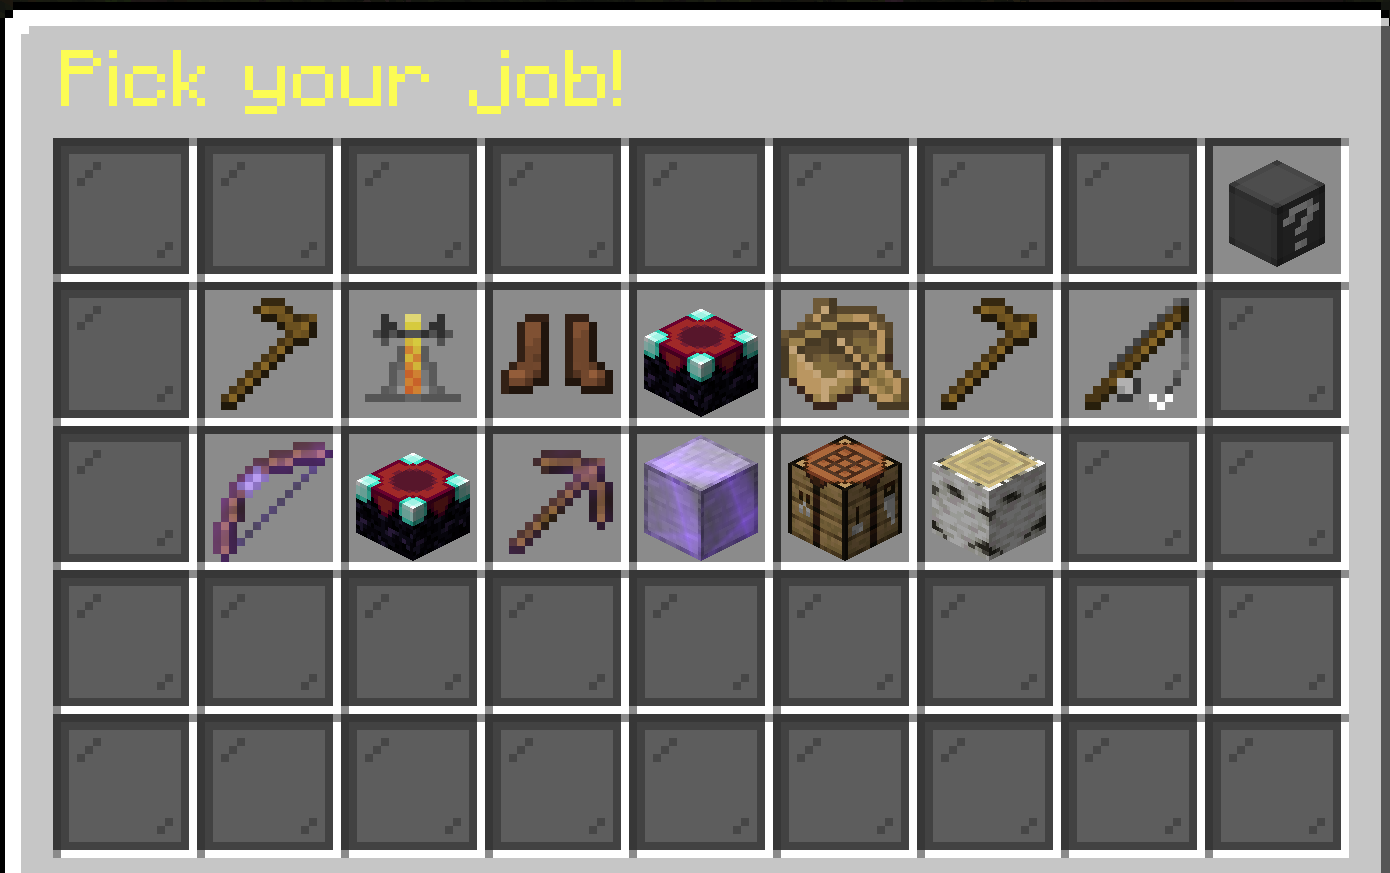 |
When starting jobs, each job has a set number of ways for you to earn XP and money. Here there are currently 13 jobs you can choose from, which we’ll take a look at briefly:
Animal Breeder - Earn rewards by breeding and taming animals, and through actions like cooking, collecting eggs, milking cows and shearing sheep
Brewer - Earn rewards through brewing with reagents and making potions
Dye Trader - Earn rewards through crafting dyes, dying leather armors, and shearing sheep
Enchanter - Earn rewards enchanting armor, weapons and tools
Explorer - A mostly a speedrunner’s job, you can earn rewards either by being one of the first three players to explore a new chunk, or you collect flowers
Farmer - Earn rewards by harvesting crops, collecting common vegetation, or cooking certain foods
Fisherman - Earn rewards by fishing, collecting ocean goods, or by breeding dolphins
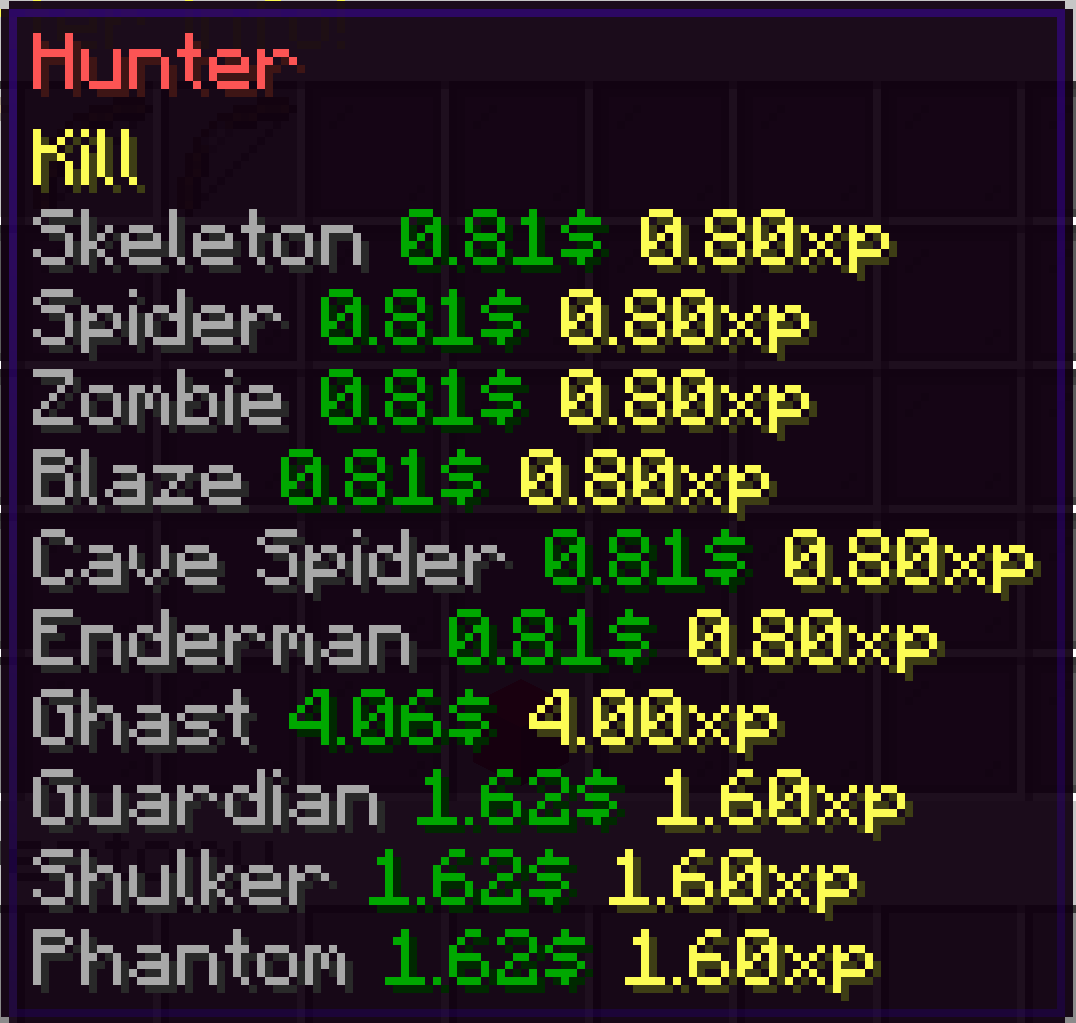
Hunter - Earn rewards by killing animals and monsters
Merchant - Earn rewards by trading with villagers
Miner - Earn rewards by breaking stones and ores and smelting ingots
Stone Mason - Earn rewards by crafting stone stairs and slabs, stonecutting bricks, and smelting blocks
Weaponsmith - Earn rewards by crafting armor and weapons, smelting, and repairing gear
Woodcutter - Earn rewards by cutting down tress, giant mushrooms, and placing saplings
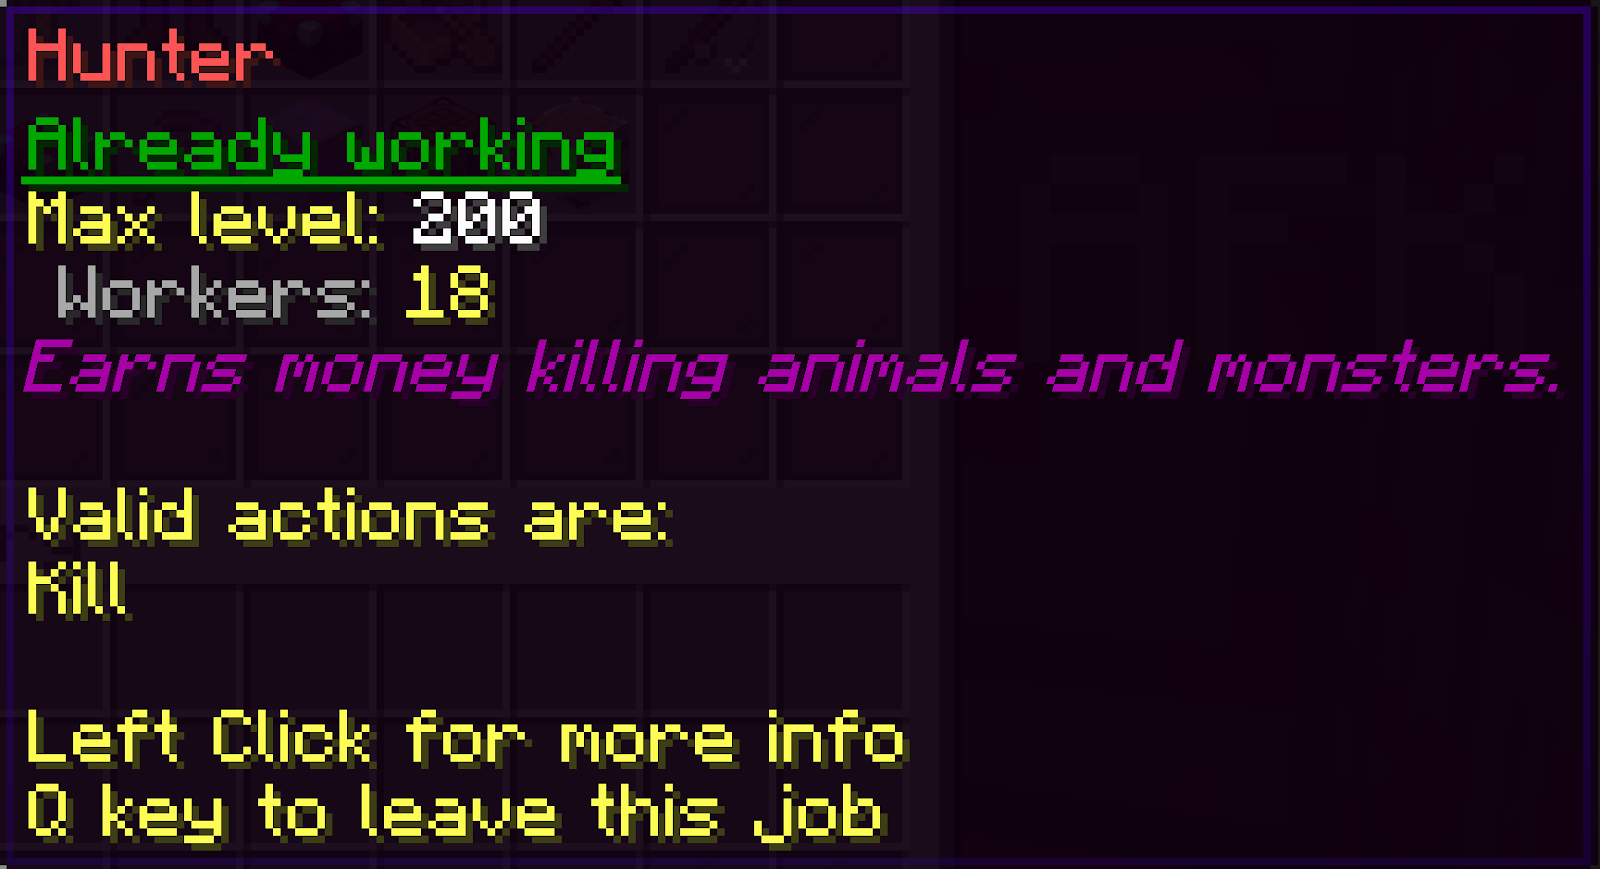 |
Scrolling over the job will show you a quick rundown of information about the profession giving you some idea of what you can expect from doing that job. Leveling up a job is primarily useful for increasing the amount of money you make from completing that task, which can be useful for helping you buy into the server economy. You can also see the number of players already doing that job where it says “Workers”. When you’re ready to join a job, right-click on the Job Icon to join that job.
If you’d like a more detailed rundown of what gains you are earning from your job, left-click on the Job Icon to view more detailed stats:
 |
Lastly, if you ever feel like leaving your current job, hover over the Job Icon and press Q to leave. Remember, you can have up to three jobs at once, so don’t feel the need to quit your day job just so you can pursue another career! (You never know when something might not work out. ;P)
To see your stats (current level & the amount of experience you need before your next level up), type /jobs stats.
 |
/jobs limit - In the server, we have a time-gated cap on XP/money gains that will occasionally warn you ahead of time if you are reaching the limit. Using this command will show you how far you are from reaching the limit at anytime
/jobs top [job name] - This will show you who the top players are in your current jobs
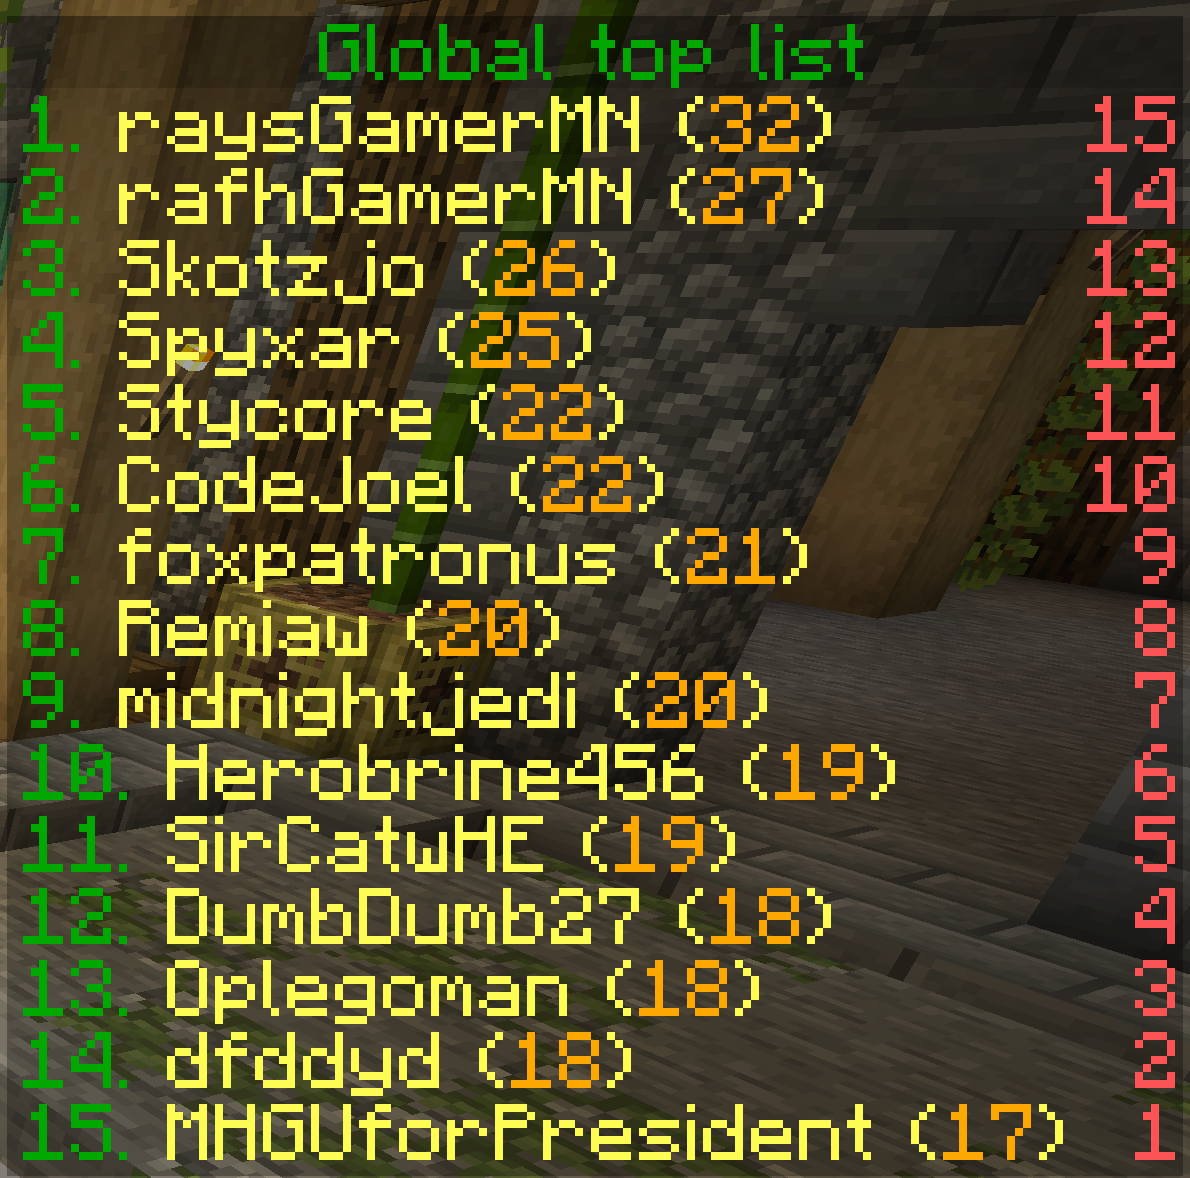
/jobs gtop - This will show you who the global top players are in terms of job levels in total (between all of their chosen professions)
 |
This is the end of your jobs training seminar player guide, and now you should be fully equipped to make like a scarecrow and be out-standing in your field of work…
NOW GET BACK TO WORK!!!
So you want to make some money using the auction house system on Sentinelcraft, eh? Well, this guide is here to offer tips about how you can close your next deal successfully and with ease! Listed below is our quickstart guide to using the auction house system as well as a reference sheet for all of the commands that will be useful for you to know so you can become the next CodeJoel!
/ah - open auction house GUI
/ah sell <price> - sell the item you are holding in hand
/ah big <starting price> - allows people to bid on an item, expires after 48 hours
/pa amount - check how many auctions you can have!
Notes: Tax on sell prices is 7% Tax on items left for bidding is 4% This is deducted from the amount then given to the seller.
Bidding auctions: When you bid on the item and are the highest bidder, the money is taken from your balance as a reserve to ensure you can afford the item. Once you are outbid the money is returned to you.
Disclaimer: This was made for GriefPrevention, a similar plugin, HuskClaims that we have updated to works similarly, so we have not removed the tutorial.
First thing we got to do, is to take out your golden shove. With that, right click one corner of your base (shows a diamond blocks marking it), then move to opposite corner and right click again. This claims the area. You should end up with some blocks marking your area.
If the area you set up is too small or too big, you can right clock on any of the corners to resize it. This only works for rectangular shapes. You can also click next to it, and move o the next area, to make the protection a different rectangular shape.
If you don't want everyone to be able to edit it freely and only want them to make builds in specific areas, you can use subdivisions. To use them, you need to change the golden shovel mode. To change it to that mode, use the command /childclaim [radius].
Now in your claimed area, right-click on the corner of your subdivision and then go to the opposite corner and right click again. Subdivisions show up with iron instead of gold.
Now that you have the subdivisions made, you need them to be able to build there. For that, you can use the trust commands individually in each subdivision. When you know who will build in the area, you'll have to set up their permissions:
Make sure to do them inside the subdivision. Otherwsie the person you are giving the permissions will have them everywhere in your claim.
You can remove permissions from a subdivision. Sometimes they have given others permissions to build there. So when you want to kick a player from your area, use /untrust all. This will remove the permissions of everyone in that subdivision.
To remove a subdivision, stand inside the subdivision, and type /abandonclaim. Make sure you stand in the subdivision, or else you delete the entire protection.
Abusing your powers can lead to punishment. Make sure to follow the rules.
If you are a trusted player on an inactive players' claim, you are able to request claim leadership transfer to your name, if you have a legitimate reason (you have 60 days).
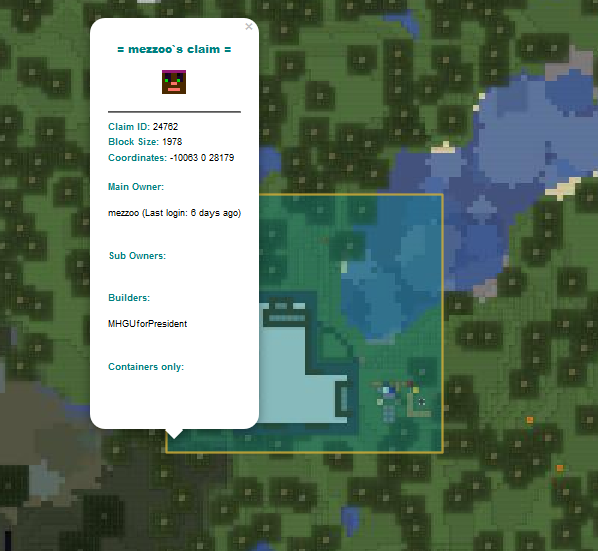
If you need help checking where your claim is, you can use bluemap. {insert new image here}
You can check your claims using /claimlist

| Command | Description |
| /trust {player} | Gives another player permission to edit in your claim. |
| /accesstrust {player} | Gives a player permission to use your buttons, levers, and beds. |
| /containertrust {player} | Gives a player permission to usse your buttons, levers, beds, crafting gear, containers, and animals. |
| /permissiontrust {player} | Grants a player permission to share their permission level with others. |
| /trustlist | Lists the permissions for the claim you're standing in. |
| /untrust {player} | Revokes any permissions granted to a player in your claim. |
| /untrust all | Revoked any permissions granted to all players in you claim |
| /childclaim | Switches your shovel to child claim (subdivision mode), so you can subdivide your claims. |
| /basicclaims | Puts your shovel back in basic claims mode. |
| /abandonclaim | Deleted the claim you're standing in. |
| /claimlist | List a player's claims and claimblock details |
Note: These are off by default, at this time there is no way to see which toggles are on in a claim
| Toggle | Command | Description | Allows |
| Monster Spawn | /claimmobspawn | Toggle Monster spawn and interaction in claim |
|
| PvP | /claimpvp | Toggle PvP in claim |
|
| Block Interact | /claiminteract | Toggle player interactions with blocks in claim |
|
| Liquid Interact | /claimliquid | Toggle player interactions with liquids |
|
| Crop Farm | /claimfarm | Toggle farmable land in the claim |
|
| Mob Farm | /claimmobfarm | Toggle monster spawn and damage |
|
| Place Vehicle | /claimvehicle | Allows players to place down boats and minecarts in the claim |
|
| Build | /claimbuild | Players can build in claim |
|
| Explosions | /claimexplosions | Toggle whether explosions can damage terrain in claims |
|

HuskTowns is a versatile, player-controlled land management plugin.
It costs $2000 to create a town. From then on, you spend money to level your town at x2 the cost of the previous level. Town levels allow you to increase your:
Abusing your powers as a mayor or trustee can lead to punishment. Make sure to follow the rules.
Players are considered inactive after 30 days without joining the server. After this time, you are allowed to remove their build, permissions. Make sure to visit their owned plot when this happens. A town will be inactive after 180 days of nobody in the town joining.
If you are a trustee and your Mayor went inactive for more than 60 days, you are able to request the Town leadership transfer to your name, if you have a legitimate reason.
If you need help checking where your town is, you can use BlueMap.
/town create [name] - Creates your own town.
/town invite [player name] – Invites a player to your time letting them join the town.
/town leave – You leave your town, leaving them behind ):
/town rename [name] – lets you rename your town.
/town color – lets you give your town name a color, when you enter the town and when you view it it becomes the color that you choose.
/town relations - View your towns’ relations.
/town relations set [ally/enemy] [town] - Sets your relation with another town.
/town relations set neutral [town] - Sets your relation to neutral with another town (Default).
/town promote [player name] – promotes a player to trustee, letting them edit town grounds.
/town demote [player name] – Demotes a player, disabling them from editing town grounds.
/town evict [player name] – Kicks a player from the town. /town ban [player name]
/town claim – Claims a chunk for your town, letting you build and break blocks there, but not letting residents and outsiders build and break in that chunk.
/town unclaim – Unclaims a chunk, It’s not your property anymore, so people can edit blocks in it.
To make a town plot from a regular claim, use /town plot and members will then be able to use /plot claim to claim the plot while it is vacant. Alternatively, you can assign someone to the plot with /town plot add <player>. Note the <player> does not actually have to be a town member. Players added to a plot have full access to build within it.
You can designate someone as a "manager" of a town plot, which will let them add others to the plot as well using the previously mentioned command. You can do this with /town plot add <player> manager.
You can remove someone from a plot with /town plot remove <player> and view a simple list of plot members with /town plot list.
/town farm - To make a town claim into a town farm claim, stand in it. Mob spawners and crops in town farms spawn/grow at boosted rates based on your town's level. Any member of your town can break and place farm blocks, crops, interact with mobs as well as access containers in town farms. They can't, however, build or break most structures.
/town setspawn – sets the town spawn where you’re standing.
/town clearspawn – lets you remove the spawn point of your town.
/town greeting – when entering town chunks make a message appear on the players screen.
/town farewell – When leaving town chunks make a message appear wishing them farewell.
/town withdraw [amount] – lets you take money out of your town bank for all your gambling problems!
/town deposit [amount] – lets you put money in your town bank and save it, rather than spend it all, smart choice
The war system is something fun for the ones that want to go into friendly battles over a wager. There is no grief involved, and it only happens when both parties consent to the war (A party declares it, a party accepts it and both are enemies)
A War is between two towns, and a few requirements must be satisfied between both towns before going to war:
/war declare [town] [wager] - Mayor declares war with a town over a wager of a minimum of 10k.
/war accept - Accepts the war. The defending town will receive a message informing them that a war declaration request has been made against them. They must then accept the terms of war (including the proposed wager).
| Level | Cost to | Member Limit | Claim Limit | Crop Growth Rate | Mob Spawner Rate |
|---|---|---|---|---|---|
| Level 1 | $2650 | 8 | 24 | 102.5% | 102.5% |
| Level 2 | $3700 | 12 | 32 | 105.0% | 105.0% |
| Level 3 | $5150 | 16 | 40 | 107.5% | 107.5% |
| Level 4 | $7000 | 20 | 48 | 110.0% | 110.0% |
| Level 5 | $9250 | 24 | 56 | 112.5% | 112.5% |
| Level 6 | $11900 | 28 | 64 | 115.0% | 115.0% |
| Level 7 | $14950 | 32 | 72 | 117.5% | 117.5% |
| Level 8 | $18400 | 36 | 80 | 120.0% | 120.0% |
| Level 9 | $22250 | 40 | 88 | 122.5% | 122.5% |
| Level 10 | $26500 | 44 | 104 | 125.0% | 125.0% |
| Level 11 | $31150 | 48 | 120 | 127.5% | 127.5% |
| Level 12 | $36200 | 52 | 136 | 130.0% | 130.0% |
| Level 13 | $41650 | 56 | 152 | 132.5% | 132.5% |
| Level 14 | $47500 | 60 | 168 | 135.0% | 135.0% |
| Level 15 | $53750 | 64 | 184 | 137.5% | 137.5% |
| Level 16 | $60400 | 68 | 200 | 140.0% | 140.0% |
| Level 17 | $67450 | 72 | 216 | 142.5% | 142.5% |
| Level 18 | $74900 | 76 | 232 | 145.0% | 145.0% |
| Level 19 | $82750 | 80 | 248 | 147.5% | 147.5% |
| Level 20 | $91000 | 88 | 264 | 150.0% | 150.0% |
| Level 21 | $99650 | 96 | 280 | 152.5% | 152.5% |
| Level 22 | $99650 | 104 | 296 | 155.0% | 155.0% |
| Level 23 | $118150 | 112 | 312 | 157.5% | 157.5% |
| Level 24 | $128000 | 120 | 328 | 160.0% | 160.0% |
| Level 25 | $138250 | 128 | 344 | 162.5% | 162.5% |
| Level 26 | $148900 | 136 | 360 | 165.0% | 165.0% |
| Level 27 | $159950 | 144 | 376 | 167.5% | 167.5% |
| Level 28 | $171400 | 152 | 392 | 170.0% | 170.0% |
| Level 29 | $183250 | 160 | 408 | 172.5% | 172.5% |
| Level 30 | $195500 | 168 | 424 | 175.0% | 175.0% |
For additional commands see: https://william278.net/docs/husktowns/wars
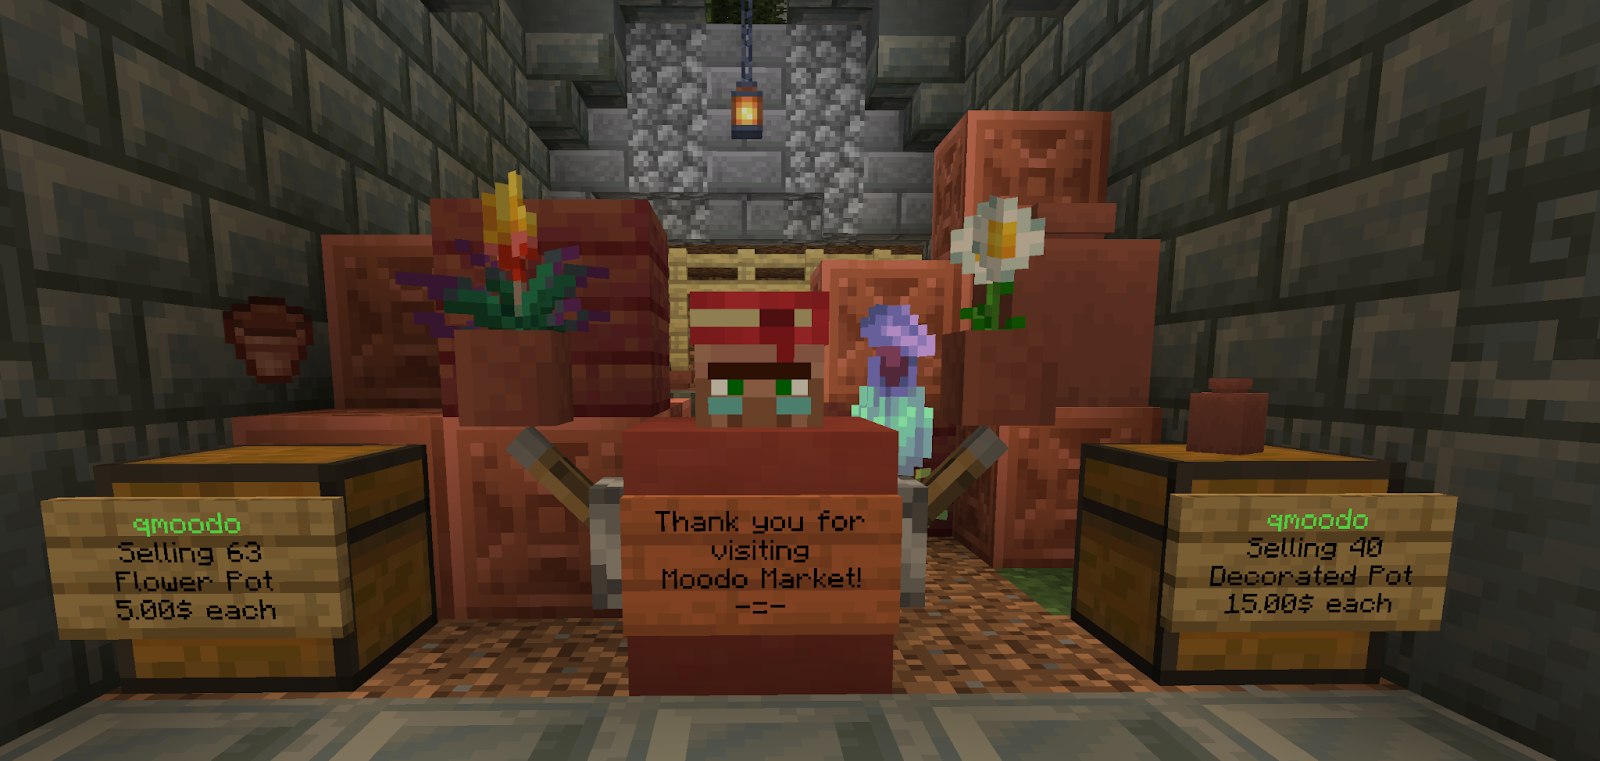
So you want to make some money using the chest shops on Sentinelcraft, eh? Well, this guide is here to give our two cents about how you can establish your own shop successfully and with ease! Listed below is our quickstart guide to using the chest shop system as well as a reference sheet for all of the commands that will be useful for you to know so you can become the next Market!
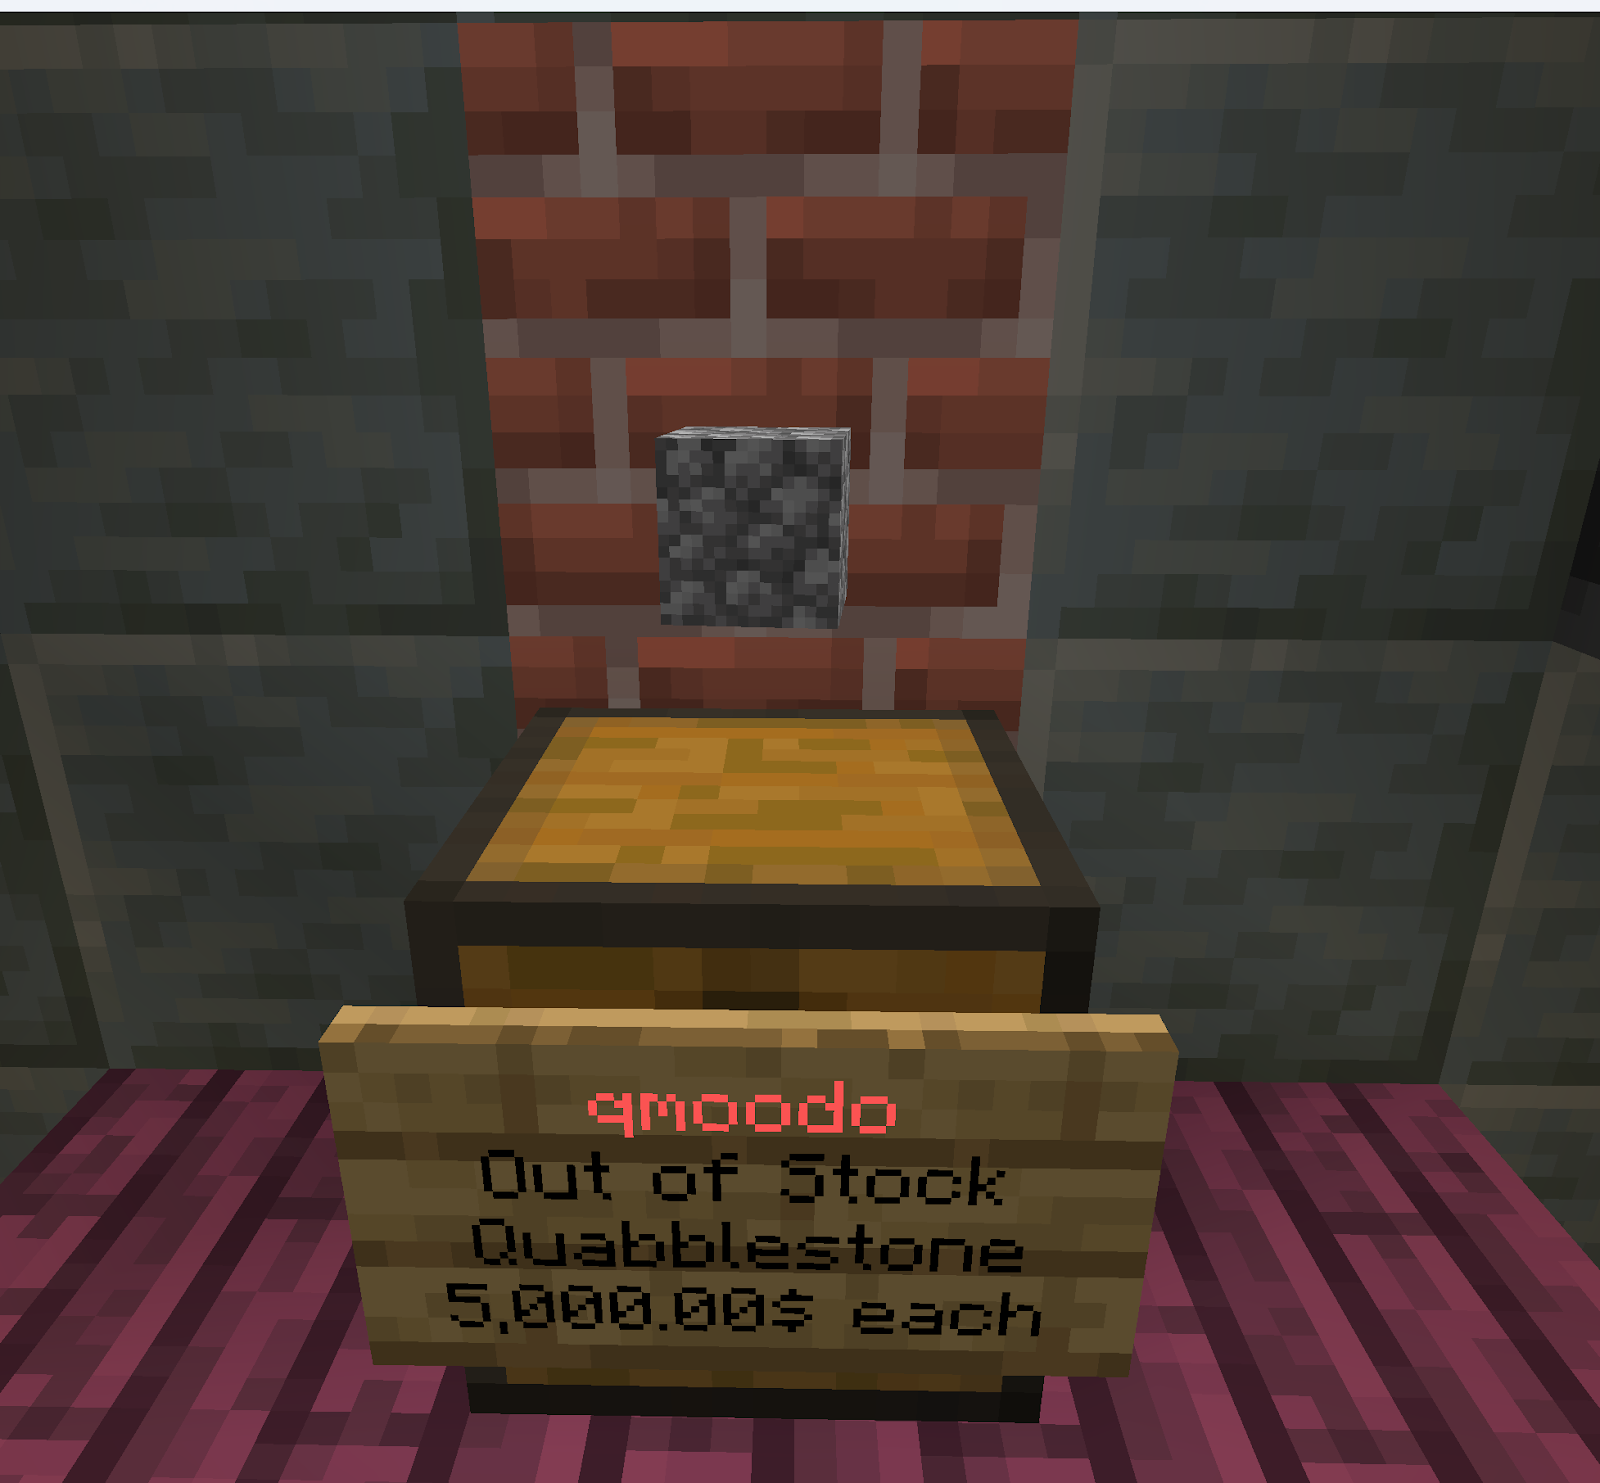
To start, simply place chest on the ground. While holding the item you want to sell in this shop, hold the item you want to sell in your hand and type /qs create <buy price>. If you want to establish a shop that purchases goods from others, don’t worry! There are settings you can alter we’ll get to in a bit. For now, just set a number that works to get started. The result of this command will transform your chest into a shop!
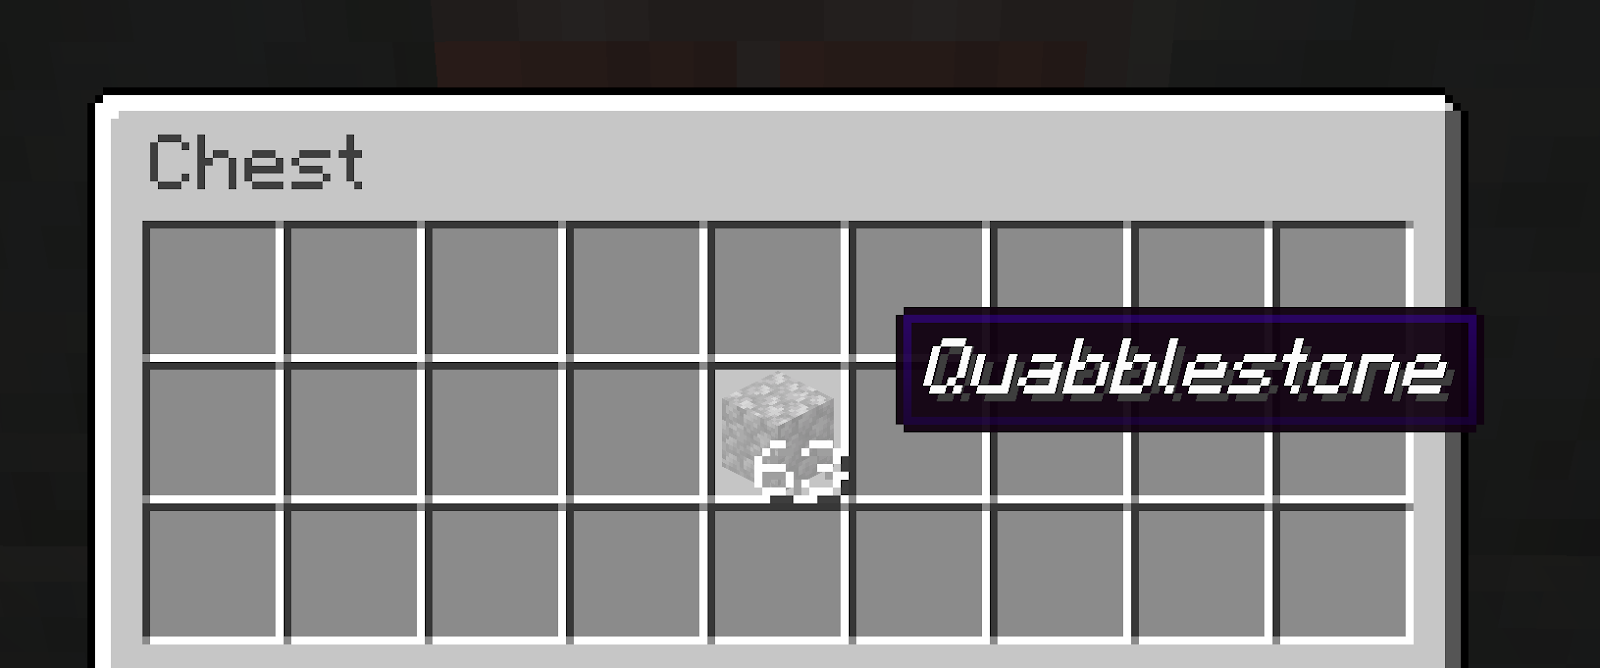
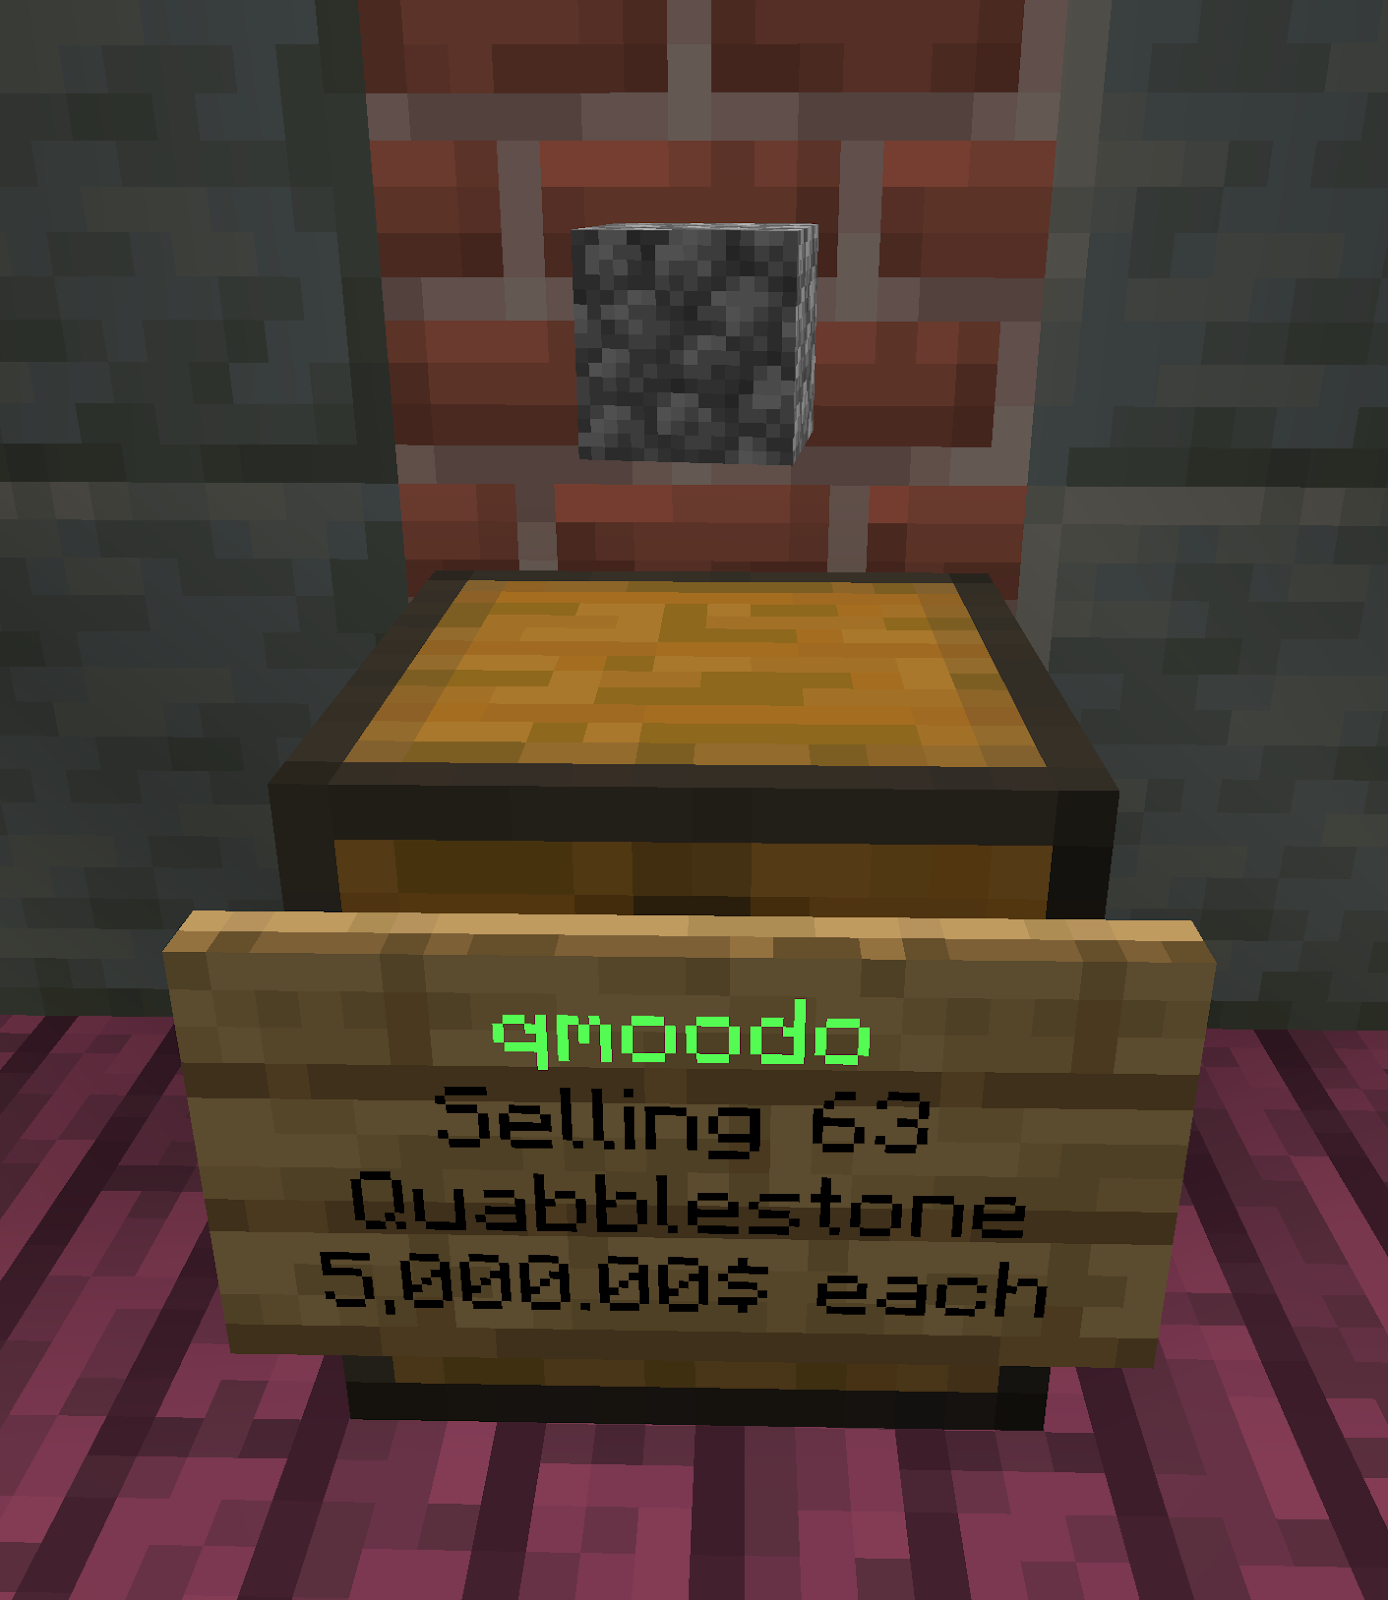
After your shop is made, you’ll want to stock your shop with materials to sell! Place your goods inside the chest and your shop sign will update to show the stock available for purchase.
Now let’s take a look at setting up a shop that people can sell their goods to you for— perhaps you want to make your bees happy and need some more red flowers. Let’s go ahead and /qs create our shop, and then type /qs buy <buying price> while looking at the shop. Now you’re in the market for some bee bouquets! [WARNING: The money compensates your buying shops is taken from your /balance! User discretion is advised.]
There’s a few more neat ways you can customize your shop to cater to both your consumer and employee interests:
Employee cuts: Running a business empire can be difficult or tedious to maintain on your own. That’s what using your friends is for! You can give them a cut of the profits from your shop by typing /qs benefit add <playername> <percent>% The percent will determine how much of a cut they will get from the shop’s profits. Just make sure your friend is online before you do this!
Looking to buy?: Let’s say you’re visiting a local town you’ve heard has a lot to offer, but you don’t know where to find the item you’re looking for! Type /qs find <search inquery> and it can tell you if there’s a shop in the vicinity and how many blocks away from it you are!
Price Gouging: Being effective in the market requires an awareness of supply and demand. If prices are competitive, you can edit the prices of your wares by looking at your shop and typing /qs price <price>
This plugin is pretty straightforward, so do your best to build a marketplace that will attract customers across the server. Someday, you too might become a mogul if you’re willing to bargain for it! ;)
| Commands | Description |
| /itf toggle visibility | Toggles the visibility of the item frame you are currently looking at |
| /itf toggle glow (colour) | Applies a glow colour to the item frame you are looking at. Available to donor rank Farmer I and above |
| /itf togglemode visibility | Enables multi-frame mode, allowing you to punch item frames to toggle their visibility |
| /itf togglemode glow (colour) | Enables multi-frame mode, letting you punch item frames to apply a glow colour. Available to donor rank Farmer I and above |

We have implemented new in-depth player statisitcs with a standalone website. This will allow you to track multiple things about your activity on the server and give you a greaterr understanding on how you play!
In-game, run the command /plan register. You need to be at least a member to register. This will give you a link tyo click on. Depending on your browser it may say the connection is unsafe, be we are hosting the website on the same dedicated machine as the server and not trying to steal your data, it is safe to proceed.
After this point, it should give you a webpage which looks like the following:
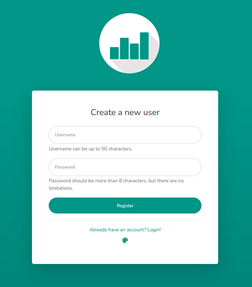
Use the same username as you do in the server and make up a password, preferably one different from one used on other sites. Once you have provided this information ,it should now give you the following popup on the page:
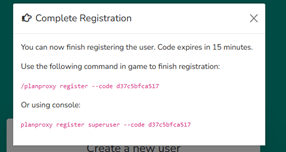
Copy the first command it gives you, and run it in-game and you should get the following message in game:
![]()
You have now successfully linked your in-game account to the statistics website!
If you ever forget your password to your account, we as staff do not have access to that. You must reset it following these steps:
There are two ways in which you can view your statistics either through the in-game commands or through the website:
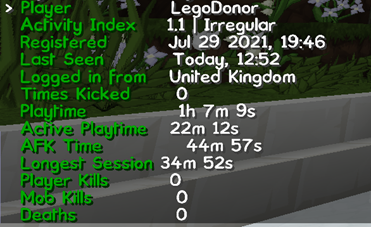
In-game: You can view basic statistics in-game using /plan ingame, it shall look like the following:
On the website: To view more in-depth statistics about yourself, you can use /plan player ingame. It should give you a link to follow the statistics website. Use the username and password you entered earlier to link your account to login.
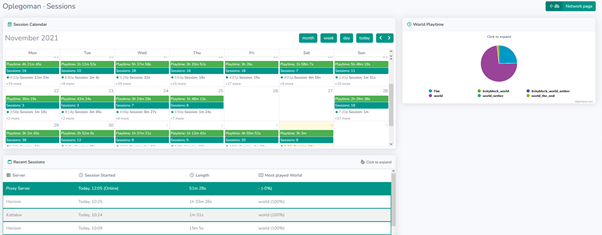
Once you have logged in you should see a page that would look something like this:

There is a lot of information displayed on this page, take your time with reading this page. One the left hand side, there are further pages to dive deeper into your statistics.
This tab allows you to search through and see which days you have been online and for how long you have been online!
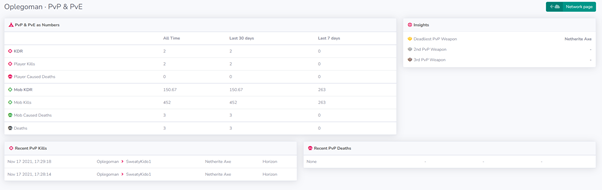
This tab allows you to see information about your player deaths and player kills, also gives in-depth information
This tab allows you to see information about which servers you have played on the most and even for how long.
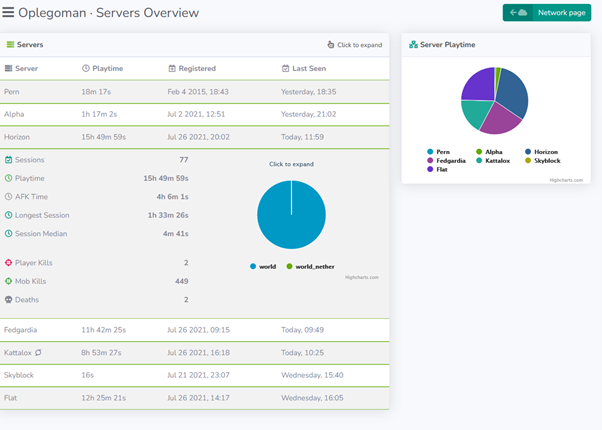
Under this tab there is a lot of data for each of the servers! A lot of this data is personal and specific and why there is no screenshot of this. Take your time to look through all of this as it does make for some really interesting reading!